Tuesday, March 22, 2011

Putting the Back On.

Final steps prior to closing up the box...

Signing the soundboard before closing – #1 Michael McCatty makingaguitar.blogspot.com
Finishing up the chiseling the braces so the back fit's to the sides. I also drew a line around the back and cut it semi flush to the sides so the back doesn't crack when I'm tying it down.

Applying the glue prior to setting the back down.

Clamped the tail block down first, then the heal- block. Then I used a bunch of paracord to tie the board down tight.

Another angle
Put more clamps on for good measure, Not sure if this was a good idea, (probably won't do it again, but I did have a shim-sheet under the guitar).
This is what it looked like after taking the strings off.


I need to flush trim the box tonight. May even start on the binding...


Thursday, February 17, 2011

Before the Box is Closed

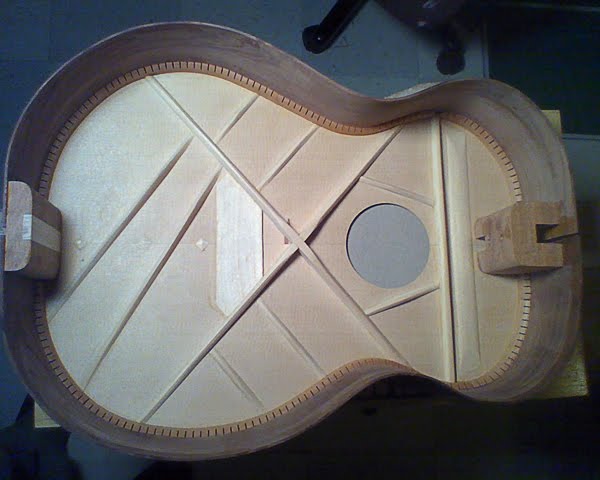
There are a few little items to finish up prior to closing up the top. One I completed last night. The inside back was sanded down and looked great when I installed the braces, but after sanding the braces down I noticed a lot of sanding marks on the back plate. I think it was because I was sanding against the grain with 220. So last night I sanded between the braces with 220 going with the grain. I think because this is such a hard wood it shows any little imperfection including fine sanding marks. So I went up to 320... after a while of sanding with that I decided to give scrapping a try... Bingo! That worked perfect – wish I had done that from the start.

This method makes the wood look awesome, even without any finish applied...

I probably will do a little more sanding on the braces before I close but I will tape the back plate before I do that this time.

Super Smooth. I also tried to scrape the inside sides but realized there isn't enough room for the scrapper. So I sanded that instead. you can't see the sides very well once this is closed so I don't think I'm going any further than 220 sanding with the grain. It looks great.

I plan to do the rest of the finish sanding on the inside tonight and may sign and close this thing up this weekend.

Wednesday, January 12, 2011

Kerfing for the Back

Finished up cutting the rest of the wood for the mortise (with a fretsaw). I also finished sanding the top of the sides and heel-block. The kerfing that will hold the back in place was next on the list.

One side all glued up.All those rings are just rubber-bands that spilled out of the clothespin holder.
Photo this morning of all the kerfing done!

So the next step is gluing the back in place. I will most likely do this later this week or weekend. I will need to do a last go-over sanding anything that is left on the inside and fixing any glue squeeze-out. I've included the photo of the back and neck just to show how far we've come on this project. It is really getting close.

Tuesday, January 11, 2011

Trimming the Sides

Now that the sides are glued in place each needs to be shaped to fit the contour of the back of the guitar. The tail-block is 4" and the heel block is more shallow. I drew parallel lines from the tail-block to a location about 2" behind the waist – from there the sides will angle down to the heel-block. You can see the lines drawn on the sides in the photo below (heel block).
Almost all of this wood removal was done with this handy small plane. However I did use a chisel from time to time.

Getting close, I only removed about 1/8" in the back but had to remove almost a whole inch in the front.

Just a little further...
Once I was very close to each block, I used that sanding board (shelf) that has 80 grit sandpaper spray-mounted to it. This was VERY noisy, almost like a turkey call or fingers on a chalkboard. This will create two flat planes. I will round them off slightly, later after the kerfing is glued on.

I used sidewalk chalk to see where the sandpaper was hitting and where I needed to sand more...

Here the sides are sanded flush with the tail-block.


The heel-block is sanded almost to completion, but I had to stop. It was getting late and I'm sure my wife would appreciate me stopping all the noise. I will finish this up tonight – not much further to go. This photo gives you a pretty good idea what the contour will be...


I decided to start to chisel out the mortise for the neck joint. This makes way less noise. I stopped short of the soundboard – I didn't want to accidentally puncture it with the chisel. I think I will probably cut the rest with a fret saw or maybe the dremel.Can't wait to get back on it tonight!

Monday, January 10, 2011

Gluing the Sides On

After the kerfing was glued in place, I sanded the kerfing flush with the sides on a sanding board. The sanding board was simply a shelf with sandpaper spray-mounted to it.

Gluing the side to the tail-block. I used several clamps to get a lot of pressure.
Then I used a ton of clamps on the sides.
Not a great photo but this is the seam between the soundboard and the sides. The cardboard under the soundboard allows for the soundboard to keep it's bowed shape without breaking under the clamping pressure.


I had to cut grooves in the kerfing (with a chisel) to allow the braces to fit snug.

Top view after the sides are glued up. There is still a lot of over hang (the top over the sides) and the shape of the top isn't defined, but that will be fixed after the back is glued up.

A few photos of the guitar with the sides glued on.

The sides will need to be carved flush with the mortise of the heel-block (also flush with the top).
This is where the sides attach to the tail-block. I will place another light patch of wood here (Maple) after the back is glued on.
I'll have to check back, but I don't know if I mentioned the difficulties I had getting the sides to match. I ended up having to clamp one of the sides in place for several weeks to get it to remember it's shape. It was tough getting to this point and I was afraid of messing something up. It was difficult for me to "pull the trigger" and actually put glue down. I'm glad I did now. Excited to get to the next step tonight!


Tuesday, November 23, 2010

Gluing the Heel-block and end block, also gluing the kerfing to the sides

Decided how to connect the neck to the soundboard: I didn't like the option that was in the book and I didn't like an experience I had with screw in nuts (back when I did the box joint jig). Plus the screw in nut would be going into end grain on the neck... So I decided to try a furniture style nut. Like below.You will see the holes drilled in the heel-block to accept the neck of the guitar. The other hole at the bottom is for the truss bar adjustment screw.
One of the things that was holding me back from finishing up this project and for that matter, what could have made the inlay much easier was this tool below. I finally ordered a routing base specifically designed for binding, but also great for inlay. Can't wait to use it!
You will notice three cleats (diamond shaped pieces of wood) on the soundboard. I added those a while ago but didn't post. that process. It was simply gluing on some Sitka Spruce squares and chisel them into a pyramid shape.

Making sure the end-block is at a 90° angle to the soundboard.

Gluing down the end block.
Gluing up the heel-block.
I used that scrap block of wood from an earlier post that I saved to keep this heel-block pressure straight down. (because the top is cut at an angle.) See top of block photo below.

Gluing the kerfing on the top of each side of the guitar. I had to put rubber bands on each of the clothes pins to apply more pressure to the kerfing. (better clamp)


Above you can see the reverse kerfing that I ended up using. (not what I made...)


All glued up! Now that's a lot of clothes pins. I used the business card and sponge to apply the glue.

If you're still following this blog, write me a comment below! I could use the encouragement... or critiques.

Monday, November 22, 2010

Where did I go?

Ok, so I took a very long break since July...

New puppy has been taking most of my time for the last couple months...
Her name is Jasmin or Jazzy.I've been doing a lot of other stuff too, but now it's time...
I'm back. Although I wasn't posting I did do a lot of sanding and refining the soundboard (more on that later). Also, I wasn't 100% sure what I wanted to do as far as the kerfing went. I decided against using the kerfing that I made and will use reverse kerfing instead. I was just afraid that the thickness of my table saw blade was just too thick to make good kerfing... I don't know but that's what I did.

I will be posting photos up tomorrow to show that process.